

To pack a garage for moving, start early, sort everything into keep, sell, donate and dispose piles, then pack hand tools, garden gear and bulky equipment in sturdy, labeled boxes and bins. Set aside anything flammable or hazardous, because movers generally cannot load it. Garages are usually the slowest room in the house to pack, so give yours its own block of time, ideally a few weekends before a long-distance move.
This guide walks through the whole job in order, with the supplies you need, the items that need special handling and a realistic schedule for a cross-country or interstate move.
TL;DR
- Start with the garage: it holds the most clutter and the most items movers will not take, so it needs the longest lead time.
- Sort first. Every tool you donate or sell is one you do not pay to move across state lines.
- Paint, propane, gasoline, lighter fluid and similar products are treated as hazardous materials. Plan to use, donate or dispose of them before moving day.
- Wrap sharp tools, bundle long items, drain gas-powered equipment and label every box by contents and destination room.
- Stage packed items in one zone near the door so the crew can load quickly and you can check the count.
Table of Contents
- Why the garage deserves its own plan
- Step 1: Sort before you pack anything
- Step 2: Gather the right packing tools and supplies
- Step 3: Pack hand tools and sharp items safely
- Step 4: Handle power tools and gas-powered equipment
- Step 5: Pack garden tools and long-handled items
- Step 6: Bikes, sports gear, holiday bins and everything else
- Step 7: Label, organize and stage for loading
- A realistic garage packing schedule
- Our perspective: the garage is where moves go off track
- Let us pack the garage for you
- Final word
- FAQ
- Sources
Why the garage deserves its own plan
A garage mixes things that do not belong together: heavy tools, fragile glass jars of screws, long rakes, half-empty chemical cans, sports gear, holiday bins and a workbench nobody has cleared in years. On a long-distance move, the cost and the risk both add up. A weight- or volume-based estimate grows with every box, and a leaking can of solvent can ruin the furniture packed next to it.
Redfin’s month-long packing timeline puts storage areas and least-used spaces, the garage included, in the first week of packing. It also advises draining liquids from gas-powered tools and cleaners, bundling long items and labeling tool boxes clearly. That order makes sense: you are not using the garage items day to day, so you can pack them early without disrupting your household.
If your move is 30 to 60 days out, aim to finish the garage at least two weeks before the truck arrives. That leaves slack for dump runs, donation pickups and the things you find behind the shelves.
Step 1: Sort before you pack anything
The fastest way to shrink a garage move is to move less. Walk the space with four containers or marked floor zones:
- Keep and move: tools you use, quality garden equipment, sports gear, seasonal decor.
- Sell: bikes, extra ladders, power tools you have duplicates of, exercise equipment.
- Donate: usable paint-free items, camping gear, old but working tools. Many charities and habitat reuse stores take tools and building materials.
- Dispose: broken items, rusted hardware, empty containers, expired chemicals.
Be strict with the “someday” pile. A useful test for a cross-country move: if you would not pay to ship it to the new house, and could replace it for less than the cost of moving it, let it go. Cheap garden hoses, warped plastic bins, partial bags of potting soil and single-use drop cloths rarely earn their place on a truck.
Take a trash bag around the space first and clear the obvious junk: scrap wood, bent nails, bottle caps, dead extension cords. Then sort by category rather than by shelf. Gather every screwdriver in one spot and every box of fasteners in another, so you pack like with like.
Check what your mover will not take
This is the step many people skip, and it changes what you do with the sorted piles. The U.S. Department of Transportation’s Federal Motor Carrier Safety Administration lists common household products that count as hazardous materials, including paint, paint thinner, lighter fluid, gasoline, propane cylinders and automotive maintenance chemicals. It also warns that packing hazardous or perishable items without your mover’s knowledge can limit the mover’s liability.
Our own checklist of items movers won’t move covers the full list. For the garage, plan around these:
- Propane tanks and gas cans: use them up, donate full propane cylinders to someone local or take them to a household hazardous waste site.
- Paint, stain and solvents: use, give away or dispose of them. Your county or city waste authority usually runs a drop-off program.
- Motor oil, antifreeze, fertilizer, pool chemicals and pesticides: same approach.
- Car and loose lithium batteries: ask your mover how they handle them before you pack. Power tool batteries are best carried with you.
- Ammunition and fireworks: do not pack these in a household shipment.
The local authority differs by county, so search for “household hazardous waste” plus your county name for drop-off days and rules.
Step 2: Gather the right packing tools and supplies
Garage items are heavy and awkward, so ordinary kitchen-style packing does not work. Here is a practical supply list:
| Supply | What it is for |
|---|---|
| Small, heavy-duty boxes | Hand tools, hardware and anything dense. Small boxes keep weight manageable. |
| Medium boxes | Power tools, extension cords, sports gear |
| Plastic totes with lids | Outdoor gear, camping equipment, hardware sorted by type |
| Packing paper and bubble wrap | Blades, glass, fragile fixtures |
| Old towels or moving blankets | Padding sharp edges and cushioning box bottoms |
| Heavy-duty packing tape | Sealing and reinforcing box bottoms |
| Zip-top bags and small containers | Screws, bolts, drill bits, brackets |
| Rope, bungee cords or ratchet straps | Bundling long-handled tools |
| Stretch wrap | Holding bundles together and keeping drawers closed |
| Markers and labels | Contents plus destination room |
| A folding hand truck | Moving heavy boxes to the staging area |
A folding dolly is worth having. Heavy tool chests and toolboxes are easier to shift on wheels than to carry down a driveway. You can also reuse sturdy totes you already own, but make sure lids latch and nothing is cracked.
If you would rather skip the buying and the lifting, our professional packing service is priced at $1 to $2 per cubic foot, and the crew brings its own materials.
Step 3: Pack hand tools and sharp items safely
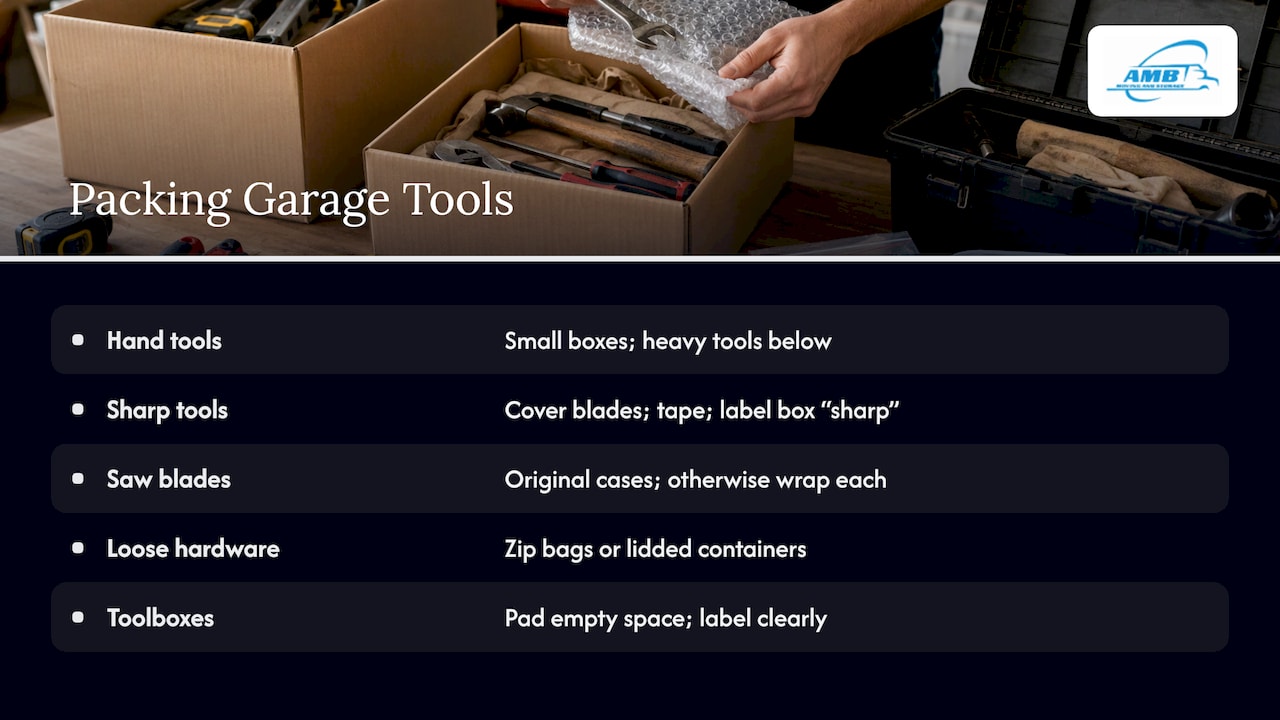
Hand tools are small but dense, so a box of them gets heavy fast. Pack them in small boxes and stop when the box is easy to lift.
Hand tools. Line the bottom of the box with a towel or crumpled packing paper. Place heavier tools like hammers and wrenches on the bottom, lighter ones above, and fill gaps so nothing shifts. Keep the tools in pairs or sets together.
Sharp tools. Chisels, saws, utility knives, hatchets and pruning shears should be covered. Wrap blades in an old towel, packing paper or stretch wrap, tape the wrapping securely, and keep them together in a box labeled “sharp.” That label tells the crew to handle it with care.
Saw blades and drill bits. Leave them in their original cases where possible. If you lost the case, wrap each in paper and group in a small container.
Nails, screws and bolts. Put loose hardware in zip-top bags or small lidded containers, then group those inside a box. If you can, keep screws and brackets for disassembled shelving taped to the shelf itself or in a bag labeled for that piece.
Toolboxes. A toolbox can go as is if the latch holds and the weight is reasonable. Fill empty space with towels so tools do not rattle, and label it clearly. Redfin’s timeline suggests the same: label tool boxes so you can find them again.
The tool kit you keep. Pack a small bag with a drill, a screwdriver set, a tape measure, a utility knife, pliers and a few spare screws. Keep it with you or load it last, so you can reassemble beds and mount fixtures on arrival.
Step 4: Handle power tools and gas-powered equipment
Power tools need three things: cleaning, protection and stable packing.
- Clean first. Wipe off sawdust, grease and dirt.
- Remove batteries and cords. Coil cords loosely, secure with a tie, and pack batteries separately and with you where possible.
- Use the original case if you have it. If not, wrap the tool in a towel and place it in a snug box.
- Drain the fuel. Lawn mowers, string trimmers, leaf blowers, chainsaws and generators should be run dry or drained of gas and oil before moving. Redfin specifically recommends draining liquids from gas tools as part of garage prep. Since gasoline is a hazardous material, do not leave the fuel in a can and expect it to travel.
- Let engines cool if you have recently used them.
For a heavy workbench, table saw or stationary equipment, remove detachable parts, wrap them separately, and tape a bag of hardware to the main body. Tell your mover about anything very heavy ahead of time so the crew and the estimate account for it. Special pieces, like a safe, fall under specialty handling, which we list from $200 on our moving cost guide.
Step 5: Pack garden tools and long-handled items
Rakes, shovels, brooms, hoes and ladders are bulky but not fragile. The goal is to make them easy to carry and stop them from poking through other belongings.
- Clean off soil. Dirt can carry weed seeds and makes a mess in the truck.
- Bundle similar items together using rope, bungee cords or stretch wrap. Wrap the sharp ends with a towel or cardboard.
- Put hand trowels, pruners and small cultivators in a box, wrapped as sharp tools.
- Coil hoses loosely and drain them first. Pack them in a tote so they do not get tangled.
- Empty planters and clay pots, and nest them with paper between each. Consider whether they are worth moving at all.
- Collapse folding chairs, tables and outdoor furniture and wrap in blankets or stretch wrap.
Keep outdoor gear, garden tools and hardware in separate, well-labeled bins, as Redfin suggests. When the crew unloads, they can send garden items to the new garage and hardware to the workshop corner without you opening a single box.
Step 6: Bikes, sports gear, holiday bins and everything else
- Bicycles: remove pedals if they are in the way, lower or turn the handlebars, and wrap the frame. Tell the mover if there are e-bikes, since their batteries are handled differently.
- Sports equipment: deflate balls partially, bundle bats, golf clubs and hockey sticks, and pack helmets in boxes with soft items.
- Holiday decor: these bins are usually already packed. Check lids, reinforce with tape, and label by holiday.
- Camping gear: clean and air dry tents and sleeping bags completely so nothing grows mold in a truck for days. Empty camp stoves of fuel.
- Cleaning supplies: many are classified as hazardous or are liquids. Use them up. For vacuum cleaners, empty the canister, wrap the cord and pack the attachments in a bag taped to the unit.
- Pool table, piano or other heavy specialty items: these are not DIY. See our pool table moving guide.
Step 7: Label, organize and stage for loading
A good labeling system matters more with a garage than with a bedroom, because the boxes all look alike and they weigh differently.
Use this format on at least two sides of each box: room + category + weight note. For example: “Garage: hand tools, HEAVY” or “Garage: sharp, wrapped.” Number the boxes and keep a simple list on your phone, so you can check the count at delivery.
Then stage:
- Clear a zone near the garage door, away from the car’s path.
- Put heavy boxes on the bottom, near the door, so the crew loads them first.
- Group bundles, bins and boxes by category.
- Separate anything not going on the truck, such as the donation pile, the dump run and your personal kit, and mark it clearly. Crews can only load what they are told is going.
- Keep the garage door and driveway accessible. Note any long carries, stairs or narrow paths in advance, since elevator, stair and long carry fees start from $75 and are listed in our moving cost guide.
Our guide on how to prepare for movers on a long-distance move goes through the rest of the house, and our piece on protecting belongings during a move helps with the valuables.
A realistic garage packing schedule
Here is how the work breaks down for a family doing a long-distance move.
| When | What to do |
|---|---|
| 6 to 8 weeks out | Walk the garage, list what is there, schedule the hazardous waste drop-off, list items to sell |
| 5 to 6 weeks out | Sort, sell and donate. Use up fuel, paint and chemicals |
| 4 weeks out | Buy supplies. Pack seasonal items, camping and holiday bins |
| 3 weeks out | Pack hand tools, hardware, garden tools |
| 2 weeks out | Drain gas equipment, disassemble shelves and workbench parts |
| Final week | Label, count, stage. Keep a small tool kit aside |
A two-car garage packed with tools, and a workshop especially, can take several full days even for a determined household. If the calendar looks tight, hand the garage to professionals.
Our perspective: the garage is where moves go off track
When we plan an interstate move, the garage is the room customers underestimate most. It looks like “a few boxes,” and then the tool chest, the ladders, the shelving and the unlabeled bins add up.
Our approach is structured planning: walk the space early, flag what cannot ship, and make sure the crew knows about heavy or awkward pieces before moving day. That clear communication is built into how we work with long-distance and cross-country customers, and it keeps the estimate and the day itself predictable.
For households that do not have the weekends to spare, we offer packing, storage and specialty handling as part of one move, so the garage does not become the last unfinished job on the list.
AMB
Let us pack the garage for you
If you are comparing interstate movers and want the garage handled without the lifting, AMB Moving & Storage Inc. offers professional packing at $1 to $2 per cubic foot, with short- and long-term storage available from $0.50 per cubic foot when your new home is not ready. We handle long-distance moving and nationwide moving for homeowners and families, and our interstate and state-to-state services cover multi-state logistics from start to finish.
Tell us what is in your garage and where you are headed, and we will build moving cost estimates around it. Request your free quote.
Final word
Packing a garage comes down to order: sort hard, deal with hazardous products early, protect sharp and heavy tools, label by contents and stage everything near the door. Do it a few weeks ahead and your cross-country move starts with one big job already finished. If you would rather not, we are ready to help. Get a quote and tell us about your move.
FAQ
How long does it take to pack a garage for a move?
A lightly used one-car garage can take a day or two. A two-car garage with a workshop often takes several days spread over a few weekends, because sorting and disposal take longer than boxing. Start four to six weeks before a long-distance move.
What should I do with paint, propane and gasoline before moving?
These are listed by the FMCSA among common household hazardous materials. Use them up, give them to a neighbor, or take them to your local household hazardous waste drop-off. Ask your mover about anything you are unsure of.
What is the best way to pack tools so they do not get damaged?
Use small, strong boxes lined with a towel or paper, and put heavy tools on the bottom. Wrap sharp blades, keep hardware in labeled bags and fill empty space so nothing shifts. Label the box with its contents and weight.
Can movers pack my garage for me?
Yes. Our packing service is priced at $1 to $2 per cubic foot. Heavy specialty items like safes are handled separately, with pricing from $200 on our cost guide.
Should I move everything in my garage on a cross-country move?
Not necessarily. Items that are cheap to replace, such as hoses, bags of soil, old paint and worn-out plastic bins, often cost more to move than to rebuy. Keep the quality tools, gear and keepsakes, and sell or donate the rest.